This is the seventh and the final chapter of the tutorial series: Implement a RecSys.
- Chapter 1: Introduction and Project Overview
- Chapter 2: Understanding the Data and Feature Engineering
- Chapter 3: Negative Sampling
- Chapter 4: Offline Evaluation, MLflow Experiment Tracking, and Baseline Implementation
- Chapter 5: Design Session-based Recommendation System
- Chapter 6: Preparing for Serving
- Chapter 7: Building the API Layer
Introduction
In Chapter 6, we successfully prepared our serving infrastructure with MLflow model registry, Qdrant vector database, and Redis Key-value store. We’ve also populated these systems with our trained model artifacts, item embeddings, and user sequence data. We have come near the end of the journey! What’s left is to build the actual API layer that brings everything together and serves real-time recommendations to users.
This chapter explores how to package our trained models for serving using BentoML, and how to orchestrate the complete recommendation pipeline using FastAPI. By the end of this chapter, you’ll have a fully functional recommendation API running on your local machine that can adapt to user interests in real-time.
All code for this chapter is available in the api/ and model_server/ directories, along with the compose.api.yml file in the project repository.
The Serving Logic
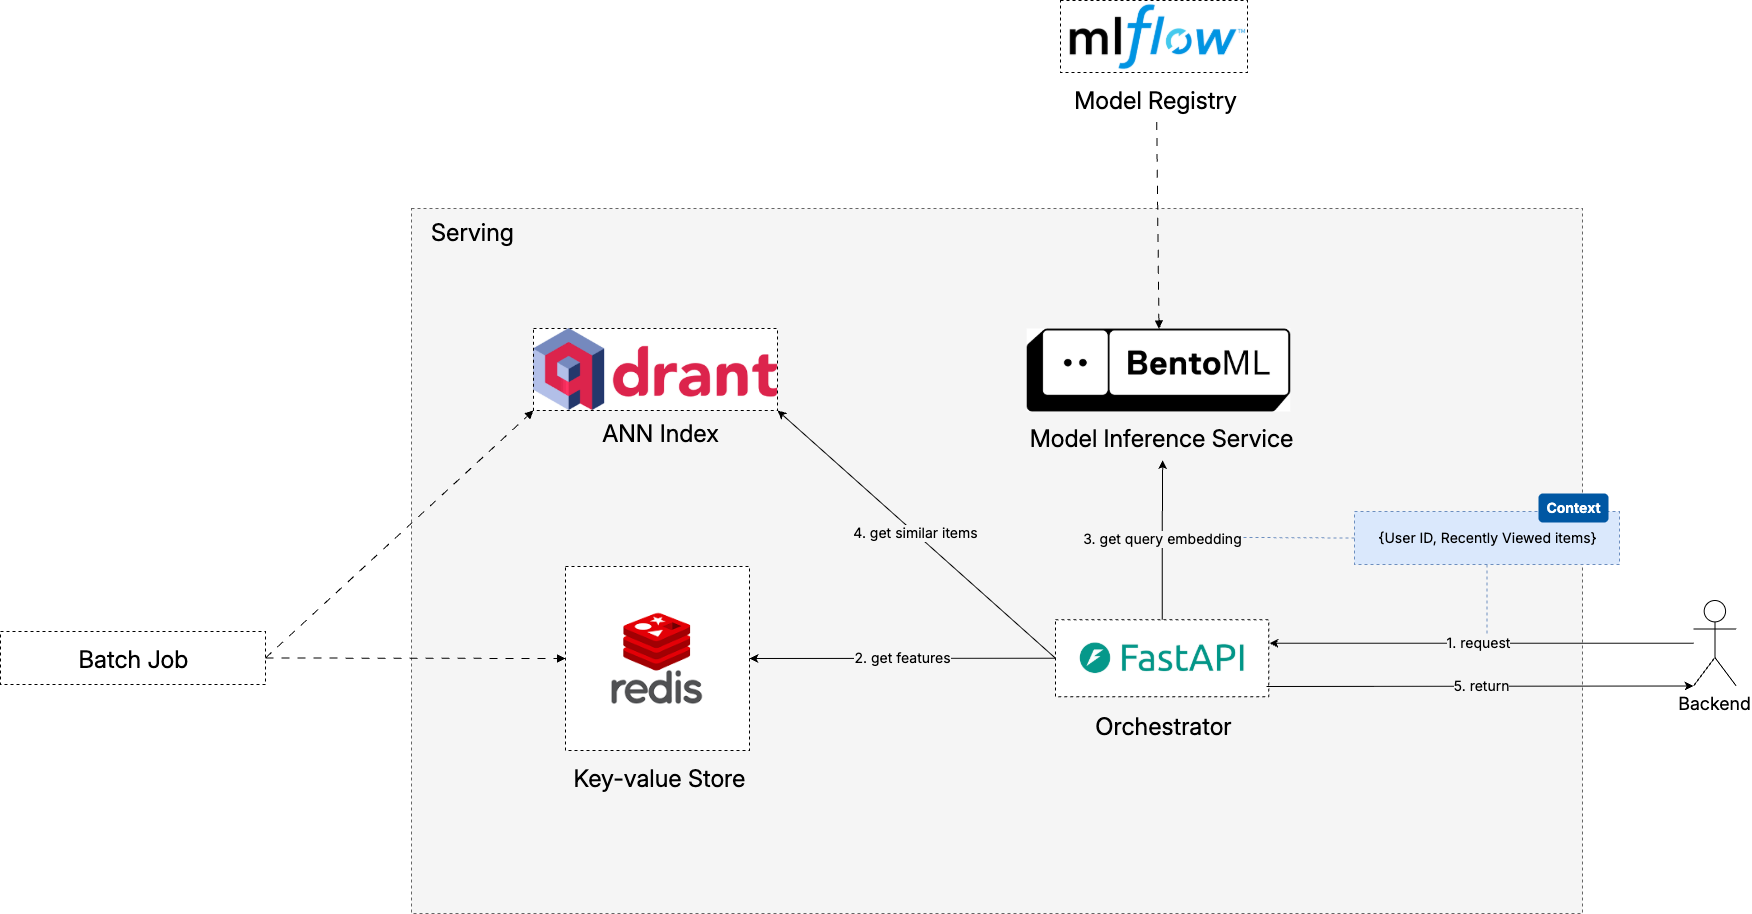
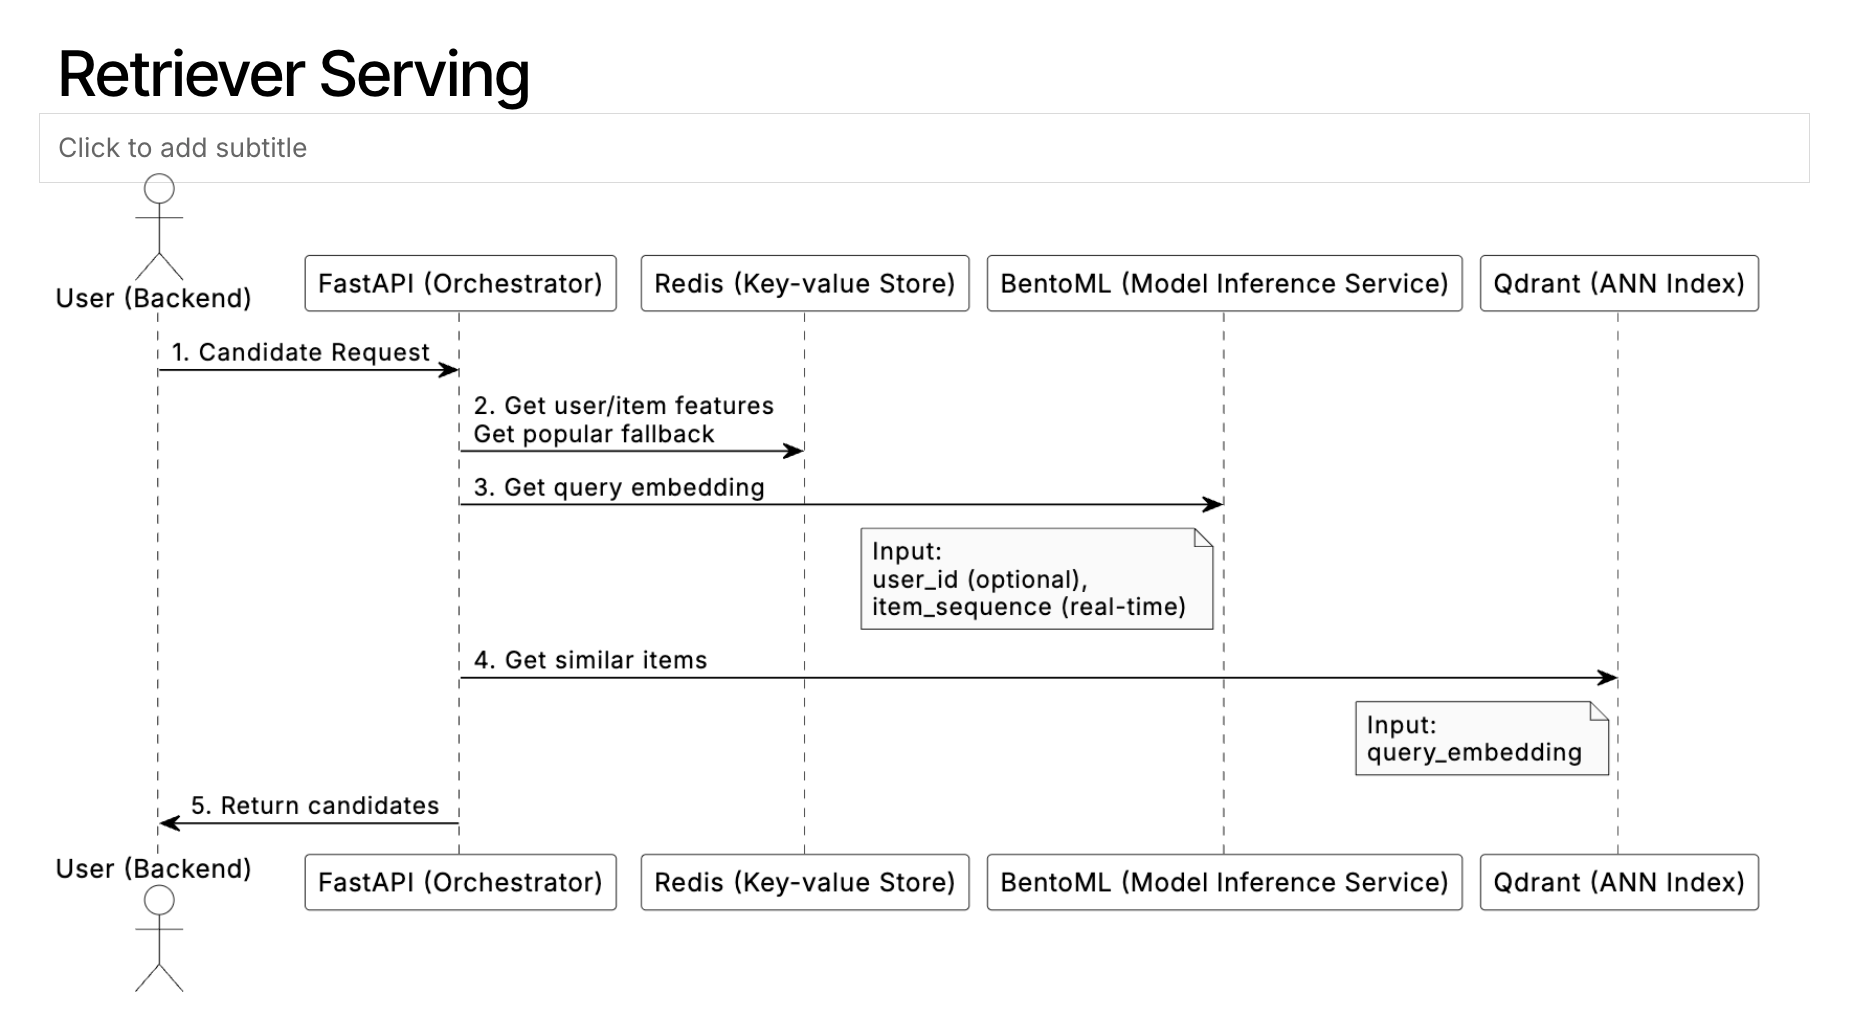
The above diagram illustrates how our recommendation system orchestrates multiple components to deliver personalized recommendations in real-time. Let’s walk through the complete flow to understand how each piece works together.
Request Processing and Fallback Strategy
Our serving architecture prioritizes personalization when possible but ensures users always receive relevant recommendations, even when personalization fails.
Initial Request and Context Gathering
When a recommendation request arrives at our FastAPI orchestrator, it contains the user’s current session context—items they’ve recently viewed or interacted with—along with an optional user identifier. The orchestrator’s first priority is to enrich this context with historical user data.
User Feature Retrieval
The system immediately attempts to fetch the user’s historical interaction data from Redis. When user context is successfully retrieved and contains meaningful interaction data, the system proceeds with the full personalization pipeline:
Query Embedding Generation: The enriched user context (historical + current session) is sent to our BentoML model server, which generates the dense representation of the user’s preferences and current intent.
Vector Similarity Search: This query embedding is used to search Qdrant’s vector database, finding items most similar to the user’s demonstrated preferences.
Filtering and Ranking: Results are filtered to remove items the user has already interacted with and ranked by relevance score.
But wait. What is BentoML model server? What is the difference between BentoML and FastAPI?
Model Server vs Orchestrator
As mentioned above, serving recommendations typically requires two kinds of logic: model inference and business rules. While business rules are operations often found in a backend system, model inference is a specialized task that has a different set of characteristics:
- Independent Scaling: Model servers sometimes require GPU resources for inference and benefit from batch processing to maximize throughput. The orchestrator, conversely, handles lightweight business logic and can run efficiently on CPU-only instances.
- Version Management: We should expect ourselves to experiment with new models frequently. Having a dedicated model server means we can deploy new model versions, conduct A/B tests, or rollback problematic releases without touching the orchestrator logic. This reduces the blast radius of model-related issues.
- Technology Flexibility: The model server can use specialized ML serving frameworks (like BentoML, TorchServe, TensorFlow Serving, or Triton) optimized for inference performance, while the orchestrator can use general-purpose web frameworks (like FastAPI, Flask, or Django) optimized for API development productivity.
A clear separation ensures that each component can be optimized for its specific responsibilities while maintaining clean interfaces between them.
For our implementation, we chose FastAPI for the orchestrator due to its popularity and developer-friendly async capabilities, while BentoML serves as our model server with its robust MLflow integration and specialized ML serving features.
While there’s not much to discuss about FastAPI, there are some specific elaborations needed on the side of BentoML regarding how I use it in this project.
BentoML x MLflow
One of BentoML’s strengths is its seamless integration with MLflow. Remember how we logged our sequence model to MLflow in previous chapters? BentoML can directly import these models along with all their dependencies and custom inference logic.
model_server/service.py
model_cfg = {
    model_name: {
        "name": model_name,
        "deploy_alias": "champion",
        "model_uri": f"models:/{model_name}@champion",
    },
}

for name, cfg in model_cfg.items():
    bentoml.mlflow.import_model(
        name,
        model_uri=cfg["model_uri"],
        signatures={
            "predict": {"batchable": True},
        },
    )
This code demonstrates how BentoML imports our trained model directly from MLflow using the champion alias. The batchable: True flag enables automatic batching for improved throughput—multiple concurrent requests will be batched together for more efficient GPU utilization.
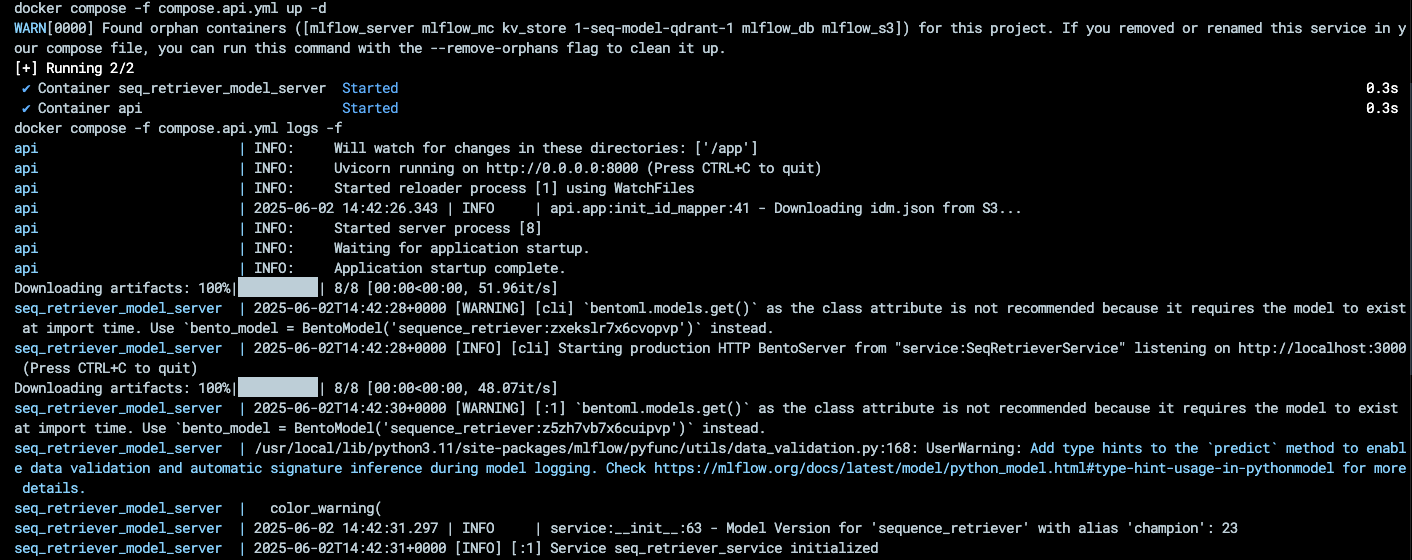
Later when you start the API services via Docker, you can observe that BentoML downloads the model from MLflow:
Custom Inference Logic Integration
In the previous chapters we didn’t talk about the src/sequence/inference.py file that exists in the src/sequence module, but if you pay attention in the training notebook, here’s what you would find:
notebooks/011-sequence-modeling.ipynb
inferrer = SequenceRetrieverInferenceWrapper(best_model)
inferrer.load_context(ctx)

if cfg.run.log_to_mlflow:
    run_id = trainer.logger.run_id
    sample_output_np = sample_output
    signature = infer_signature(sample_input, sample_output_np)
    idm_filename = idm_fp.split("/")[-1]
    mlflow.pyfunc.log_model(
        python_model=inferrer,
        artifact_path="inferrer",
        # We log the id_mapping to the predict function so that it can accept item_id and automatically convert ot item_indice for PyTorch model to use
        artifacts={"idm": mlflow.get_artifact_uri(idm_filename)},
        signature=signature,
        input_example=sample_input,
        registered_model_name=cfg.train.retriever.mlf_model_name,
    )
This SequenceRetrieverInferenceWrapper class wraps our model with inference logic that handles ID mapping, sequence padding, and tensor conversion to help BentoML to load and use the model correctly.
src/sequence/inference.py
class SequenceRetrieverInferenceWrapper(mlflow.pyfunc.PythonModel):
    def load_context(self, context):
        """
        This load_context method is automatically called when later we load the model.
        """
        json_path = context.artifacts["idm"]
        self.idm = IDMapper().load(json_path)

    def predict(self, context, model_input, params=None):
        """
        Args:
            model_input: Expected to contain keys 'user_ids', 'candidate_items', and 'item_seq'.
        """
        if not isinstance(model_input, dict):
            model_input = model_input.to_dict(orient="records")[0]
        infer_output = self.infer(model_input).tolist()
        return {**model_input, "scores": infer_output}
BentoML Service Implementation
For our retrieval serving use case, instead of just calling the model.predict() method like for a normal ML model, we need to access the model’s query embedding generation function. Our BentoML service provides multiple endpoints for different inference needs:
model_server/service.py
@bentoml.service(name="seq_retriever_service")
class SeqRetrieverService:
    def __init__(self):
        self.model = bentoml.mlflow.load_model(self.bento_model)
        self.inferer = self.model.unwrap_python_model()

    @bentoml.api
    def predict(self, ctx: RetrieveContext):
        resp = self.model.predict(ctx.model_dump())
        return self._augment_response(resp, ctx)

    @bentoml.api
    def get_query_embeddings(self, ctx: RetrieveContext):
        item_seq = [
            self.inferer.idm.get_item_index(item_id) for item_id in ctx.item_seq_raw[0]
        ]
        inputs = {"item_seq": torch.tensor([item_seq])}
        query_embedding = self.inferer.model.get_query_embeddings(inputs)
        resp = {"query_embedding": query_embedding.detach().numpy().tolist()}
        return self._augment_response(resp, ctx)
FastAPI Orchestrator: Coordinating the Complete Pipeline
While our model server handles the heavy lifting of neural network inference, the FastAPI orchestrator coordinates the complete recommendation pipeline. It’s responsible for fetching user context, calling the model server, querying the vector database, and assembling the final response.
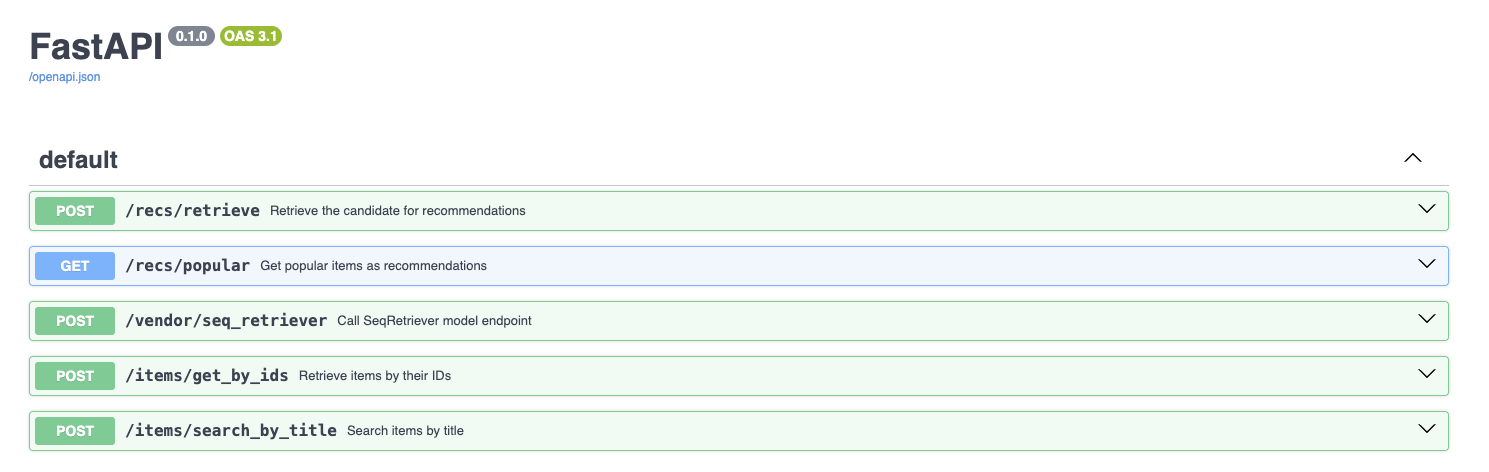
Our API provides several endpoints that support different aspects of the recommendation system:
api/app.py
@app.post("/recs/retrieve")
async def retrieve(
    ctx: RetrieveContext,
    count: Optional[int] = 10,
    rec_service: RecommendationService = Depends(get_recommendation_service),
):
    return await rec_service.retrieve_recommendations(ctx, count)

@app.get("/recs/popular")
async def get_recommendations_popular(
    request: PopularItemsRequest = Depends(),
    rec_service: RecommendationService = Depends(get_recommendation_service),
):
    return await rec_service.get_popular_recommendations(request.count)

@app.post("/vendor/seq_retriever")
async def seq_retriever(
    request: SeqRetrieverRequest,
    rec_service: RecommendationService = Depends(get_recommendation_service),
):
    return await rec_service.call_seq_retriever(request.ctx, request.endpoint)
Each endpoint serves a specific purpose:
/recs/retrieve: The main recommendation endpoint that provides personalized suggestions based on user context/recs/popular: Fallback endpoint that returns popular items when personalization isn’t possible/vendor/seq_retriever: Direct access to the model server for debugging and testing
The Service Layer
You may notice that above the endpoint almost does nothing except for calling a method from the RecommendationService class. One of the key organizational decisions in our orchestrator is the introduction of a service layer that encapsulates all business logic. This pattern, borrowed from domain-driven design, provides several benefits.
FastAPI endpoints are reserved to focus on HTTP-specific concerns like request parsing, response formatting, and error handling, while the service layer focuses on domain logic such as fetching user context, calling external services, and filtering results. This separation makes the codebase more maintainable and easier to reason about.
From a testing perspective, business logic can be unit tested independently of the FastAPI framework, making tests faster and more focused. You can test complex recommendation logic without spinning up a web server or dealing with HTTP request/response cycles. Additionally, the same service logic could be reused by different interfaces—whether REST APIs, GraphQL endpoints, or background jobs—without code duplication.
The service layer also improves dependency management by clearly declaring its dependencies, such as Redis clients, Qdrant clients, and ID mappers. This explicit dependency declaration makes the system’s architecture more transparent and easier to understand, while also facilitating dependency injection for testing and different deployment environments.
Request Processing Pipeline
Let’s trace through a complete recommendation request to understand how all components work together.
First, we have a RetrieveContext class that defines the schema for the information needed to make the retrieval request.
src/dto.py
class RetrieveContext(BaseModel):
    user_ids_raw: Optional[List[str]] = []
    item_seq_raw: Optional[List[List[str]]] = [[]]
    candidate_items_raw: Optional[List[str]] = []
This is the input to the retrieve_recommendations method.
api/services.py
class RecommendationService:
# ...
async def retrieve_recommendations(
self, ctx: RetrieveContext, count: int
) -> RecommendationResponse:
# Items to exclude from recommendations
items_to_exclude = set()
if len(ctx.user_ids_raw) > 0 and (user_id := ctx.user_ids_raw[0]):
logger.info(f"Getting recent interactions for user: {user_id}")
user_id = ctx.user_ids_raw[0]
user_prev_interactions = self.get_user_prev_interactions(user_id)[
"recent_interactions"
]
# Add user's previous interactions to exclusion set
items_to_exclude.update(user_prev_interactions)
curr_item_seq = ctx.item_seq_raw[0]
ctx.item_seq_raw = [user_prev_interactions + curr_item_seq]
# Add items from input sequence to exclusion set
if ctx.item_seq_raw and ctx.item_seq_raw[0]:
items_to_exclude.update(ctx.item_seq_raw[0])
logger.info(
f"[DEBUG] Items to exclude from recommendations: {items_to_exclude}"
)
if len(ctx.item_seq_raw[0]) == 0:
logger.info("Empty RetrieveContext, fallback to popular recommendations")
return await self.get_popular_recommendations(count)
query_embedding_resp = await self.call_seq_retriever(
ctx, "get_query_embeddings"
)
query_embedding = np.array(query_embedding_resp.result["query_embedding"])
# Get more recommendations than needed since we'll filter some out
buffer_count = count + len(items_to_exclude)
hits = self.services.ann_index.search(
collection_name=cfg.vectorstore.qdrant.collection_name,
query_vector=query_embedding[0],
limit=buffer_count,
)
# Filter out items that should be excluded
filtered_recommendations = []
for hit in hits:
item_id = hit.payload.get("parent_asin", "")
if item_id not in items_to_exclude:
filtered_recommendations.append(
{"score": hit.model_dump()["score"], **hit.payload}
)
if len(filtered_recommendations) >= count:
break
return RecommendationResponse(
recommendations=filtered_recommendations,
ctx=ctx.model_dump(),
)- 1
- Get the user’s previous interactions from Redis.
- 2
- Fallback to popular recommendations.
This above implementation demonstrates several important patterns that make our recommendation system robust and effective. The most fundamental pattern is context enrichment, where the system fetches user’s historical interactions from Redis and merges them with the current session data. This creates a comprehensive view of user behavior that spans both past preferences and immediate intent.
The system also implements graceful degradation by falling back to popular recommendations when no meaningful sequence data is available. This ensures that new users or those with insufficient interaction history still receive valuable recommendations rather than empty results.
To improve user experience, the pipeline implements a business rule-based filtering that excludes items the user has already interacted with, preventing redundant recommendations. Finally, the buffer strategy retrieves more results than actually needed to account for this filtering process, ensuring we can always return the requested number of fresh recommendations even after removing items the user has already seen.
Asynchronous Processing
You’ll notice extensive use of async and await throughout our orchestrator code. This isn’t just a modern Python practice—it’s essential for building responsive APIs that handle multiple concurrent requests efficiently.
Our recommendation pipeline involves multiple I/O operations including Redis lookups, HTTP calls to the model server, and Qdrant queries. Traditional synchronous code would block the entire process during each operation, severely limiting concurrency and creating bottlenecks that degrade user experience. With async/await, Python can handle hundreds of concurrent requests with a single thread, switching between requests during I/O waits. This dramatically reduces memory usage compared to thread-per-request models while ensuring that users don’t have to wait for other users’ requests to complete—each request is processed as quickly as possible without blocking others.
# Multiple concurrent operations that can be performed in parallel
async with httpx.AsyncClient() as client:
    response = await client.post(
        f"{self.seq_retriever_model_server_url}/{endpoint}",
        json=payload,
        headers={
            "accept": "application/json",
            "Content-Type": "application/json",
        },
    )
Request Tracing: Debugging in Production
Production ML systems can be complex to debug when things go wrong. Our API implements comprehensive request tracing to help identify issues quickly:
api/logging_utils.py
class RequestIDMiddleware(BaseHTTPMiddleware):
    async def dispatch(self, request: Request, call_next):
        rec_id = str(uuid.uuid4())
        request.state.rec_id = rec_id

        # Contextualize logger with the request ID
        with logger.contextualize(rec_id=rec_id):
            response = await call_next(request)

        # Add rec_id to the output response
        if response.headers.get("Content-Type", "") == "application/json":
            # ... add rec_id to response metadata
Unique Request IDs: Every API request gets a unique identifier that’s included in all log messages and response metadata. This makes it possible to trace a single request’s journey through all system components.
Structured Logging: Debug information is logged in structured formats that can be easily parsed and analyzed:
logger.debug(
    f"[COLLECT] Payload prepared: <features>{json.dumps(payload)}</features>"
)
Response Enrichment: The middleware automatically adds request metadata to responses, providing clients with debugging information without cluttering the main API logic.
This tracing infrastructure becomes invaluable when debugging issues like:
- Why did a specific user receive unexpected recommendations?
- Which requests are taking longer than expected?
- Are there patterns in failing requests?
Real-Time Context Integration
As we discussed in Chapter 1, our recommendation system uses a simplified request-payload approach for real-time context integration rather than complex streaming architectures. This design choice allows us to focus on the ML aspects while maintaining the benefits of real-time personalization. Let’s see how this works in practice within our serving architecture.
The API payload demonstrates the core implementation of this approach—recent user interactions are included directly in each recommendation request through the item_seq_raw field, which contains items the user has interacted with in their current session. Our orchestrator then merges this real-time session data with historical user data retrieved from Redis, creating a comprehensive view of user intent that spans both immediate behavior and long-term preferences.
This implementation delivers the advantages we outlined in Chapter 1, starting with minimal signal delay since user interactions are captured client-side and sent immediately with recommendation requests, eliminating the latency of updating server-side state. The stateless nature of each request makes the system easier to scale and debug, as all necessary context is self-contained within the request payload. Additionally, users can continue browsing and building session context even when temporarily disconnected, as the frontend maintains the interaction history locally until the next API call. Finally, users do not really need to refresh the view to get updated recommendations.
A New Docker Compose File
With both our model server and orchestrator implemented, we need to deploy them as a coordinated system. Below is our new compose.api.yml:
compose.api.yml
services:
api:
container_name: api
build:
context: .
dockerfile: api/Dockerfile
ports:
- "8000:8000"
environment:
- REDIS_HOST=kv_store
- SEQ_RETRIEVER_MODEL_SERVER_URL=http://seq_retriever_model_server:3000
- QDRANT_HOST=http://qdrant
command: ["uvicorn", "api.app:app", "--host", "0.0.0.0", "--port", "8000", "--reload"]
seq_retriever_model_server:
container_name: seq_retriever_model_server
build:
context: .
dockerfile: model_server/Dockerfile
ports:
- "3000:3000"
environment:
- MLFLOW_TRACKING_URI=http://mlflow_server:5000
entrypoint: ["bentoml", "serve", "service:SeqRetrieverService", "--reload"]
networks:
recsys-mvp:
external: true- 1
-
Note how our API orchestrator points to the model server by the container name
seq_retriever_model_serverand the port3000.
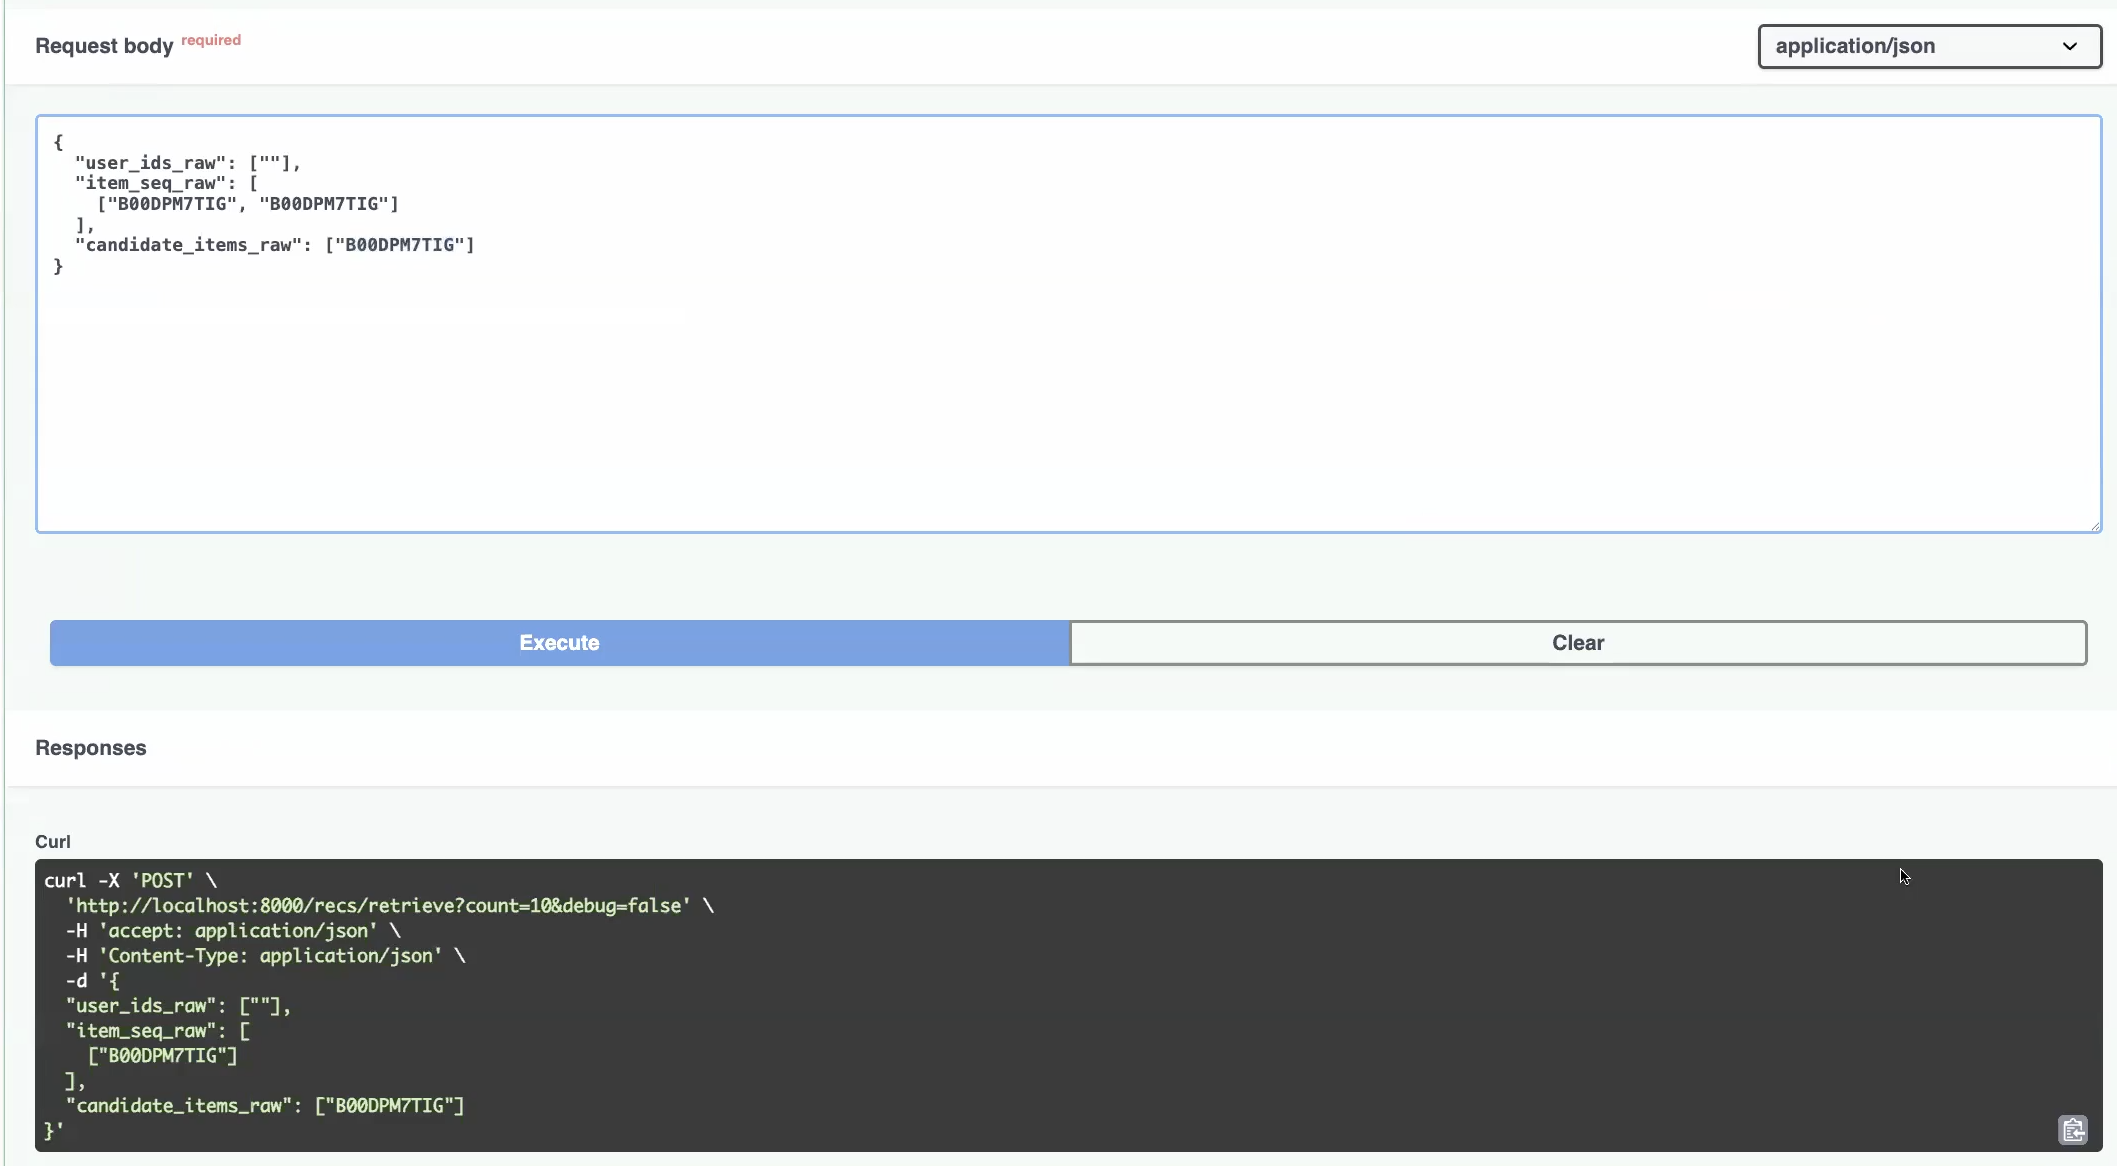
Testing the Complete System
With our API layer complete, we can test the entire recommendation pipeline end-to-end. Here’s how to start the complete system and verify everything works:
# Start the base infrastructure (from Chapter 6)
make ml-platform-up

# Start the API layer
make api-up

# Test the personalized recommendations
curl -X 'POST' \
  'http://localhost:8000/recs/retrieve?count=2&debug=false' \
  -H 'accept: application/json' \
  -H 'Content-Type: application/json' \
  -d '{
  "user_ids_raw": ["AE224PFXAEAT66IXX43GRJSWHXCA"],
  "item_seq_raw": [
    ["0439064864", "043935806X"]
  ],
  "candidate_items_raw": []
}'
The system responds with structured recommendation data including items, scores, and metadata. Each response includes the request ID for tracing and debugging.
{
  "recommendations": [
    {
      "score": 0.6588092,
      "main_category": "Buy a Kindle",
      "title": "Still Life with Crows (Pendergast Series Book 4)",
      "average_rating": 4.6,
      "rating_number": 5120,
      "price": "None",
      "subtitle": "Kindle Edition",
      "image_url": "https://placehold.co/350x525/0057a3/ffffff.png?text=Still%0ALife%0Awith%0ACrows%0A%28Pendergast%0ASeries%0ABook%0A4%29&font=raleway",
      "parent_asin": "B000Q9INGI"
    },
    {
      "score": 0.6399034,
      "main_category": "Buy a Kindle",
      "title": "Blue Labyrinth (Pendergast Book 14)",
      "average_rating": 4.5,
      "rating_number": 11969,
      "price": "9.99",
      "subtitle": "Kindle Edition",
      "image_url": "https://m.media-amazon.com/images/I/51HKSzxX3OL.jpg",
      "parent_asin": "B00IRISI74"
    }
  ]
}
Recap
In this chapter, we completed the journey from model training to model serving by building the API layer that transforms our sequence-based recommendation model into a system that can respond to real user requests in real-time.
We implemented a two-layer architecture that separates model inference concerns from business logic orchestration. The BentoML model server handles the computationally intensive neural network inference and seamless MLflow integration, while the FastAPI orchestrator coordinates the complete recommendation pipeline including user context retrieval, fallback logic, and result filtering. This separation enables independent scaling, version management, and technology optimization for each layer.
The serving pipeline implements the simplified payload approach for real-time context integration that we outlined in Chapter 1, where user interactions are captured client-side and included directly in API requests. Combined with the three-pillar infrastructure from Chapter 6, our system can now fetch user sequences from Redis, generate query embeddings through the model server, perform vector similarity search in Qdrant, and gracefully fall back to popular recommendations when personalization isn’t possible—all within the response time requirements for production recommendation systems.
All code for this chapter is available in the api/ and model_server/ directories, along with the compose.api.yml file in the project repository.
Final Step
Let’s not forget that in our code repository, we have a ui/ directory that contains the frontend demo that you saw in the introduction chapter.
Now with all the pieces in place, refer to the project README.md > Start UI section for how to get the frontend web application running. It’s a great way to conclude our project!
The End
That’s it, friends! I hope you enjoyed this blog series tutorial and learned something new.
If you’re looking to get a big summary, please go back to the Chapter 1.
- Chapter 1: Introduction and Project Overview
- Chapter 2: Understanding the Data and Feature Engineering
- Chapter 3: Negative Sampling
- Chapter 4: Offline Evaluation, MLflow Experiment Tracking, and Baseline Implementation
- Chapter 5: Design Session-based Recommendation System
- Chapter 6: Preparing for Serving
- Chapter 7: Building the API Layer
If you understand Vietnamese and want to check out the webinar’s version of this tutorial, you can find it here. Note that you will need to register the account on FSDS to access the recording, under Community > Webinars > Webinar 5.
As a farewell gift, I have composed a list of awesome RecSys resources for you (in no particular order):
- Eugene Yan’s Blog
- Sequence models for Contextual Recommendations at Instacart
- Youtube Paper Deep Recommendation 2016
- Airbnb Search Ranking and Recommendations
- Related Pins at Pinterest: The Evolution of a Real-World Recommender System
- Blueprints for recommender system architectures: 10th anniversary edition
They are all good reads that I have learned a lot from.
Happy building!
If you find this tutorial helpful, please cite this writeup as:
Quy, Dinh. (May 2025). Implement a RecSys, Chapter 7:
Building the API Layer. dvquys.com. https://dvquys.com/projects/implement-recsys/c7/.